How the Generators work in setting the power level per shape
Beginners to Lightburn often need clarification on how the PowerScale tests work; They often wonder,
"When the layer is set to 100% power, how does each shape cut at a different power level?"
The answer is shape power scales. This is a somewhat hidden setting that allows you to assign power levels to individual shapes!
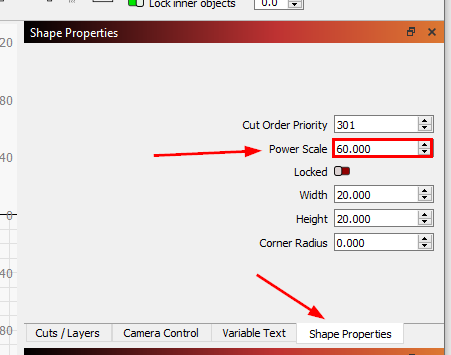
You can access the shapes "Power Scale" setting in the "Shape Properties" Menu. To show this, you must go with the Window menu to show the panel (Not open by default on a new install).
So if all the shapes share the same layers settings, such as speed and passes, you do not need to create a separate layer for each shape to vary the power output; you can instead set the layer to the maximum power level and then change the power output of the laser.
The power scale is not the actual power output,
but is a percentage BETWEEN the min and max output power settings so its important you calculate this correctly,
For example, with an Laser set to a Max Power of 70% and a Min Power of 20%,
setting a 50% power scale will result in 45% laser power output (Halfway between 20% and 70%).
So for Power Scale to work, you need to set a different min and max power. If both Min and Max power levels are the same, the power scale will have no effect.
The generators will set the Min and Max power levels, and then calculate the correct percentage for the shape's power scale to match the required output power shown on the power on the axis label!
This means that you do not need to worry about the power scale percentage used in the charts; You only need to generate the chart, laser it onto your material, pick the power level listed on the axis, and use this in the layer settings in a new Lightburn file.
You can view the documentation here (Its only one line of text so easy to miss):