Quick Overview
Nesting and Material Calculator PowerScript is a simple yet powerful rectangle packing tool to help you nest your artwork to use your stock efficiently or to calculate material usage for costing and planning purposes.
It works by laying out rectangles in the most efficient packing order, using either the best fit or easy-cutting algorithm
- Allow rotations on a print-by-print basis
- Use the selected items as the print size or manually enter in the sizes of the items, such as when costing
- When using selected artwork increase the quantity to duplicate
- Calculate multiple solutions and determines the best solution for you; you can also manually view and select the best solution
- Choose pre-sorting and nesting algorithm options
- Choose a scoring method to determine the best fit to maximize leftover waste
- Preview the computed solutions
- Turn calculated solutions into template documents with sizes, can be printed out as a specification for cutting
- Layout selected artwork and add borders to your prints
Typical Uses
- Layout artwork for printing or vinyl cutting and minimize waste / optimize media usage
- Calculate media usage for costing and estimating quotes
- Allow rotations on a print by print basis
NOTE: Nesting Powerscript is a RECTANGLE packer; all artwork will be treaded as rectangular shapes
How Nesting Works
All items are treated as rectangles, and the program calculates the most efficient packing order it can find, using either a best fit or an easy-cutting algorithm.
To calculate the best packing, the computer needs to try different nesting scenarios; with more items to nest, the problem becomes exponentially more complex, and for a few hundred items, it would take a computer years to calculate all the possible solutions. So to make the problem solvable quickly, packing algorithms use a set number of pre-defined rules to follow and pack the items in different orders to generate the final result. It will take a blank sheet, then one by one position the items on the sheet based on the preset rules; for example, try packing the smallest items first, or the largest items first or the items with the shortest sides first etc. While this might not find the perfect solution, it will find a very useful solution quickly.
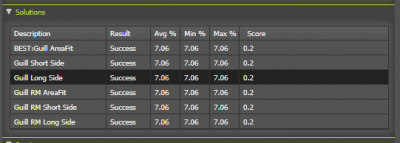
What Powerscript Nesting does is run through all the different combinations of packing strategies, and scores each one based on the total area used or the largest free area left after the run, And then selects the solution with the lowest score; you can see these in the Solutions Accordion in the advanced tab.
For most jobs, the time spent on wages for a human to find a better solution would cost more than the media saved, However, even in the cases where it might be better to hand-nest items, this nesting tool will give you a good place to start.
Does PowerScript nest complex shapes?
No, This tool treats all shapes as rectangles. There are other tools for laser cutting and CNC cutting that will nest cut paths efficiently. However, these algorithms are extremely complex and computationally expensive to compute. Ideally, requiring a dedicated program to be written to run fast enough. Under the hood, PowerScripts relies on Illustrator's built-in scripting language, which is not very fast for this type of task, so while possible, it would not be very fast as nesting artwork.
However, unlike other nesting solutions, With PowerScripts nesting, you can nest full artwork, such as grouped artwork, linked files and set the number of copies.
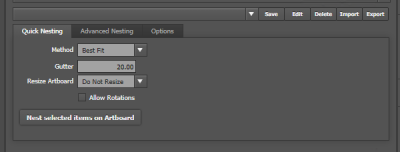
Quick Nest
For quickly nesting your artwork on the artboard:
- Method:
- Best fit will try to back the rectangles as tightly as possible
- Easy Cut will try to allow straight cuts from edge to edge, which is useful when cutting down a larger sheet with a ruler and knife.
- Gutter This is the space between rectangles
- Resize Artboard: You can choose to expand the width or height to accommodate the items, for example, if you are printing to a roll of paper 900mm wide, you can set your artboard to 880mm and then allow the height to expand to layout your jobs for printing. (Make sure there is enough space for the artboard to expand or you will get an error)
- Allow Rotation: Artwork will be rotated to get the best fit.
Advanced Nesting
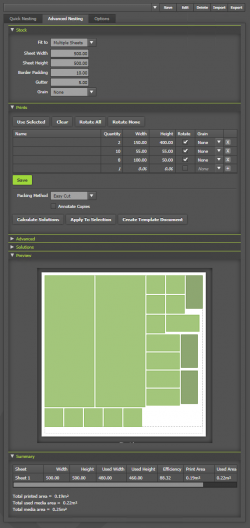
It gives you more options and control:
Typical workflow for Nesting artwork
- Set the sheet size and type to match the media you are printing, typically single sheets of the same size of a roll
- Click on [Use Seelected] to create a list of selected artwork
- Change the number of items in the print list if required and set rotate and grain options.
- Click on [Calaulate Solitions]
- You can expand the Solutions accordion to select an optional solution
- Click [Apply to Selection] to rearrange your artwork (see warning below about changing artwork during nesting)
Typical workflow for Quoting
- Set the sheet size and type to match the media you are printing, typically single sheets of the same size of a roll
- Enter in the number of items in the print list if required and set rotate and grain options.
- Click on [Calaulate Solitions]
- In Summary, you will see the total number of sheets used, and the area used, which can be used for quoting purposes.
- To save the result, Click on [Create Template Document] to create a document with the sizes
Stock Settings
- Fit to: Set how your items are nested on the stock/media
- Single sheet: Fit the prints to a single sheet; if all the items can not all fit on the sheet, you will get an error.
- Multiple sheets: If the prints fit on a single sheet, this will add extra sheets as required, (See note below)
- Artboards: Use the size of the artboards in the document as the sheet sizes, which is helpful if you are trying to use mixed stock sizes.
- Horizontal roll: Expands the sheet width to the left as required (See note below)
- Vertical roll: Expands the sheet size in height as required. (See note below)
- Border Padding: This is the space around the edge of the sheets/rolls, to allow for handling or non-printable areas around the outside edge
- Gutter: This is the space between rectangles, useful to allow enough space to trim safely
- Grain: Set the grain direction on the sheet; you can choose then to Enforce grain direction as long or short grain for fluted boards, cardboard and wood where the prints must have the grain in a specific direction for structural stability.
Note: New artboards will be created next to the active artboard, or the artboard will expand; if there is not enough space to the left of the current artboard or in the artboard will expand beyond the size of the document then you will get an error; either move the current artboard to the top left corner of the document OR as a workaround resize your artwork to 10% of the original size, don't forget also to change your gutters/borders size as well.
Print Settings
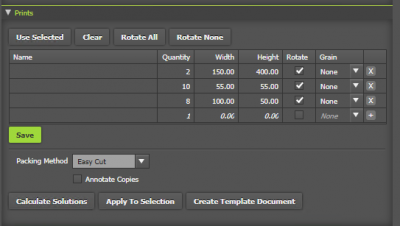
Here you can set the items to be nested; typically, you would either manually enter in the sizes or use the selected artwork.
- [Use Selected] Button: This will use the artwork selected in the document and enter it into the list of prints. When using selected artwork for nesting, you mustn't modify the artwork between adding it to the print list and laying out the nested result. If you do alter the artwork, you will not be able to apply the nesting, as you will get an artwork mismatch error
- [Clear] button : Clears the list
- [Save] button: This will save the current list, and it will be reloaded the next time you open nesting; useful if you are quoting and need to save your work.
- Print list
- Name - Enter a useful name here
- Quantity - you can change the quantity for, For selected artwork changing the quantity will duplicate you artwork
- Width/Height - Set the size here - See options to set the units used
- Rotate - When checked, the item can rotate 90 degrees to get the best fit.
- Grain - Some items must be aligned to the grain of the stock, set the grain of the items based on the long/short edge, and it will be rotated to ensure the grain matches the stock
- Packing Method
- Best fit will try to back the rectangles as tightly as possible
- Easy Cut will try to allow straight cuts from edge to edge, which is useful when cutting down a larger sheet with a ruler and knife.
- Annotate Copies - Will add a “1 of 4” … “2 of 4” annotation under copies of the artwork - See options tab for annotation text size
- [Calculate Solutions] Button - This will calculate all the possible solutions and show the results in the preview window below You must press this before you can apply a solution to the selected artwork or create a template
- [Apply to Selection…] Button - This will apply the selected solution to the artwork you previously selected
- [Create Template] Button - This will create a blank document and fill it with labeled squares as per the selected solution, useful to document the calculated solution for future use.
Advanced Settings
- Sort Prints by: - This determines the order in how prints are packed on a sheet; if you choose AUTO, all sorting combinations will be tested
- Golloutine Split: - For the Golloutine packer, the determines how, after an item is placed on a sheet, the left over free space is divided up for future prints to be placed.
- Scoring Method:
- Area Used - The solution which uses the last number of sheets will score lower, weighted towards the solution that uses the smallest used area on the last sheet, which typically will result in the least media used
- Largest Free Area - Like above but weighted to that, the last sheet with the largest unused single rectangular area is preferred, best if you want to have the largest usable offcut for other work
- Score weighted to last sheet for multiple sheets - This gives more weight to the last sheet, typically when printing multiple sheets you want the last sheet to have the most free space after printing.
Solutions
This is a summary of packing solutions calculated with the lowest score at the top. You can manually select the best solution for nesting here.
Preview
This shows you the layout which will be used.
Summary
This shows a breakdown of each sheet, and the Efficiency and total print area per sheet, with a total for the job. Useful for quoting.


